Creating a Discord Server: Step by Step Guide
- Bizimuhit

- Jan 19, 2020
- 7 min read
Updated: Jul 30, 2024

Making a server on Discord allows you to build a community full of passion about what you are working on or trying to achieve.
In the rest of the article, we will talk about the basics of professionally installing and managing Discord servers, as well as helpful resources and applications.
What is Discord?
Discord is a voice, video and text application where you can talk and hang out with your friends or anyone around the world online.
In short, Discord is a free communication software used by millions everyday.
What is Discord server?
Servers are the virtual spaces that users can join on Discord. Even though the vast majority of servers are small, invite-only servers, there are also some larger servers where tens of thousands of people joined.
Discord servers are categorized into different types of channels such as text, forum, voice, stage, etc. These channels are dedicated to some specific topics.
You can add Discord bots to your server to increase the functionality of existing features or unlock the new ones. Discord bots offer free, freemium and premium features with extended capabilities.
Why Discord Is popular?
Discord had been used mostly by gamers before 2021 but today 78% of its users are people from interests different than gaming. It is now a hub for study groups, universities, developers, gamers, AI tools and all other kind of subjects.
Discord has stood out from its competitors in the last 3 years with its wide "bot" network, fast localization policy, almost uninterrupted service it offers and completely free use. E-sports activities, which have been increasing in recent years, have a great share in this acceleration.
You can communicate with large audiences free of charge, at the simplest level, without the need of forums, Facebook groups or another app.
How to Create a Discord Server?
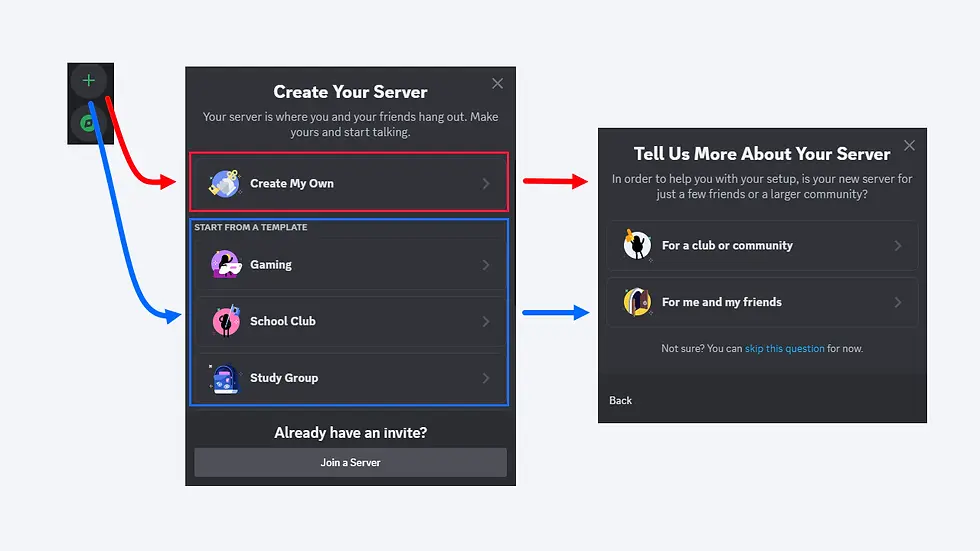
Discord server setup is a straightforward process if you follow this step by step article. You can start with a server template or create your own server template from scratch. If is not possible to find a server template that suits to your server requirements, then you can consider building a new one.

Click on the green plus icon to "create a server".
After you decide the way you create your server, you will be asked to choose whether you create this server for a small group of people or a club or community.
After this step, you will name your community and upload a logo file.
Here are the tips to customize your community server on Discord:
The name of your community should be memorizable and easy to read.
If the server will be used as a marketing channel of a brand, the brand name can be used.
Server logo should be in circular shape that fits to the vertical side bar that is used to list the server when a user joined.
Server logo should not contain much text characters on it.

Create roles and assign permissions
Discord works based on the role hiyerarchy. You create roles and assign some permissions such as the ones that allow users to "use bot commands" or "read message history".
You can customize how the role name will seem on top of the members on the members list of the server (the right side of the server).

When you create new roles, they are named as "new role" by default. You can add your own names while you are creating new roles.

You can further customize roles by changing their colours, setting permissions, adding role icons, and requirements.

When you set "displaying roles separately", each member assigned to that role will be listed separately on the member list of the server.
You can enable or disable "role mention" to prevent notification spams for the members assigned to a role.
Set requirements for roles
Certain roles on your server can require social media, wallet, or game account connections to the members' Discord accounts.
For example, if you would like to offer marketplace-like server, you may ask users to connect their Discord accounts to PayPal first, so that they can be assigned to PayPal role automatically.
If you would like to keep traders secure more on your community, you can toggle the PayPal account age and verified bank account on.

Granting permissions for roles
You can restrict or allow some members to take certain actions by setting role permissions. There are tens of options you can select from to set up permissions for a role.

Here is a dangerous permission that you have to consider before activating for a role: administrator. Roles with this permission can bypass channel-specific permissions and restrictions, add new bots to the server or manage them however they would like them to be.
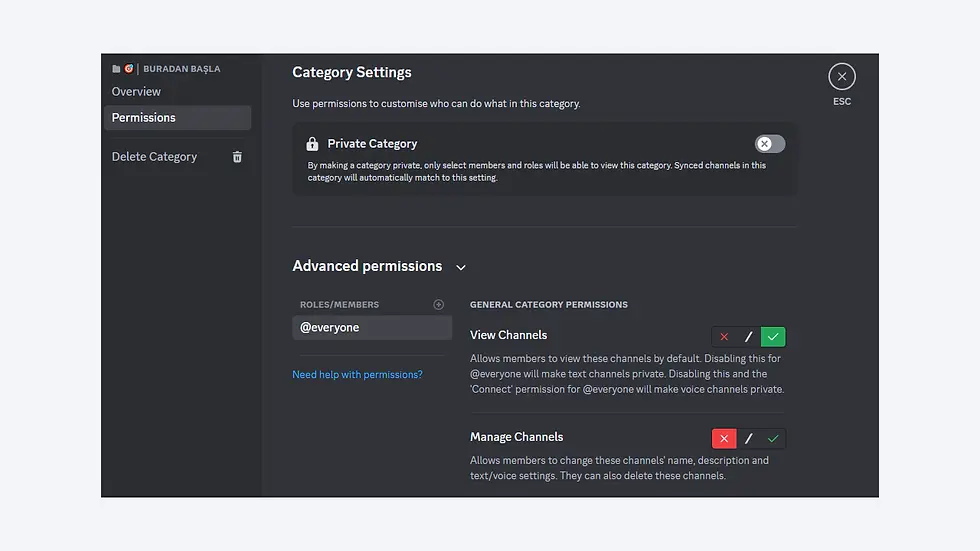
Create categories
A category is a subfolder of a server where you can attach text and voice channels.
You can grant permissions for each role on each category and just leave it for everyone access and then configure permissions for everyone.

You can categorize both text and voice channels to keep your server tidier.
Create text and voice channels
Channels are where the members of a server interact with each other.

How to Keep Your Community Safe?
Server Security
The first step in setting up professional servers is to ensure the security of both server content and its members. There are several ways to ensure server security. These;
If you have a public server, moderation settings only allow members with verified phones in their Discord account to send messages.
Make sure the objectionable media content filter scans messages from all members.
Do not assign any admin permissions, including channel moderation settings, to users you are not sure of.
In a publicly accessible channel, post your server rules and ban users who violate them directly on the server. Note that member bans are made via account and IP and can be circumvented by proxy servers.
Review server audit logs frequently. Track the activities of the bot, members and management team.
Use security bots effectively. Such bots send a verification code to the members before they are fully logged into the server, and the bot detects whether they are users or not.
Keep all bots away from your server, except for bots that are widely known and/or can serve internationally. Dangerous bots can make changes to the entire server without your knowledge.
Do not allow private messages from server members in privacy settings. Note that unsolicited server invitations may be sent by some users.
Roles and Permissions
We can start by talking about what hierarchy is. When setting up professional servers, believe in the benefits of teamwork rather than being a one-man army. Role sequencing, which does not smell of monarchy from head to toe, allows you to solve your affairs in a shorter time. Here are some recommendations:
Assign up to 1 user to a role with administrator permission. When there is another manager on the server besides you, the crown symbol next to your name disappears.
Prevent your admins and moderators from being frequently tagged in channels. Turn off the option for all members to mention these roles.
Support content creators. Create custom roles for them to be respected on the server.
Know how to reward members who contribute to your community with higher roles at no charge. They will be satisfied with it.
Categories and Channels
The first stage of the visual representation of your server is the category and channel layout. The good work you will do here will allow users to spend more time on the server. Let's talk about the channel layouts of professional servers.
On the side, an image of Bizim Muhit Discord server category and channel layout is given. Starting from here;
Create an information channel that tells new members who join the server who you or your community are, the area of activity, the hierarchical order and rules on the server.
If you don't have a public server, open a role-registration channel that allows new members to join the community.
Include the announcement channel so that members can be informed about the latest developments. Avoid frequently tagging anyone or online users while using this channel.
Chat is essential to Discord. Create 3-5 chat channels without exaggeration and mention what they should be used for in the channel description.
Add custom bots to the community or code a new one yourself. Either way, be sure to create a channel for bots and members to interact.
Support publishers. Allow them to respectfully share content they produce for you or for themselves with all members. You can also share other people's content, including your own, on live and video channels.
Tell your members about the features of this community that set it apart from other communities. A fun gaming channel might be a good idea.
Add unit codes next to channels or categories to draw more attention. When you exaggerate this, it can look pretty ugly. Apply this action only to the ones you want to highlight.
Never create dozens of unnecessary-audio and written channels.
Don't make too frequent channel and category layout changes. Proceed with the order you are sure of.
If you manage and actively use a server with 2000 or more members, make sure to create a support channel.
Try keeping logs of all actions on the server with bots. Create channels for at least 5 different jobs that are closed to everyone but you.
Invite bots to your server
Bots are tools that extend the functionality of all Discord servers. Be sure to add various types of bots to your server according to the interest level of your community.
Do not assign any permissions to bots that you do not trust, especially channel management and server management permissions.
In the following paragraphs of our article, we will talk about the bots we recommend. Keep reading.
Webhooks
With Webhooks, another tool that is as vital as bots, you can send special embedded messages or share your messages on your Discord server simultaneously with your social media accounts. IFTT, Integromat and Zapier are some of the platforms where you can create cool webhooks.
Emojis
It is the most colorful layer of your server. Do not forget to add fun emojis in desired sizes to your server in Adobe or other programs.
Best Discord Bots
All of the bots we recommend below serve in native English. If you do not understand exactly how bots are used, you can become a member of Bizim Muhit by clicking here to be instantly informed about the Discord training that we will publish on Udemy in the near future.
Rythm-Groovy
Rythm ve Groovy, yüzbinlerce sunucuda kullanılan gelişmiş müzik botlarıdır. Groovy 7/24 çalışabiliyor olsa da Rythm için aynı şey denemez.
Dyno-Mee6-Carl-Tatsumaki
En işlevsel ve detaylı genel Discord botlarıdır. Moderasyondan hatırlatıcılara, müzikten gömülü mesajlara, yayın duyurularından oto moderasyona kadar a'dan z'ye onlarca özelliği tek çatı altında sunabilirler.
Unbelieva-Poke Card-Dank Memer
Eğlenceli komutlarla sunucuyu panayıra çevirme vakti. Birbirinden farklı özellikleriyle Unbelieva, Poke ve Dank Memer hizmetinizdedir.
Medal-GameStats
Medal Bot kısa oyun klipleri paylaşmanıza imkan veren bir uygulama. Resmi olarak Discord sunucularında hizmet veren güzel de bir botları var. GameStats ise oyun hesaplarının istatiklerini inceleyebileceğiniz bir bot.
Sonuç
Profesyonel bir Discord sunucusu kurarken baş ucunuzdan eksik etmeyeceğiniz bir rehber hazırlamak istedik. Umarız, verdiğimiz fikirler ve ilhamla, başarılı bir sunucu kurmanıza yardımcı olabilmişizdir. Lütfen yazıda bulamadığınız ancak merak ettiğiniz konuları yorumlarda belirtin. Bu rehber, sizlerin talepleri doğrultusunda yeniden, yeniden ve yeniden güncellenecektir. Bizim Muhit'le kalın!


Comentarii